
Printing Photos from a Computer (Windows)
This section describes how to print photos with a software application on your computer.
-
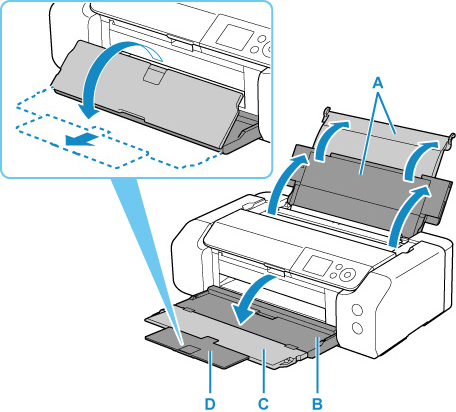
Open the paper support (A) of the top feed.
-
Open the paper output tray (B) gently.
-
Open the output tray extension (C), then pull out the paper output support (D).
-
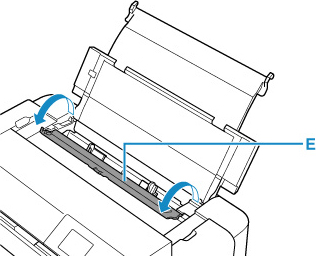
Open the feed slot cover (E).
-
Slide right paper guide (F) to open both paper guides and load the paper in the center of the top feed WITH THE PRINT SIDE FACING YOU.
-
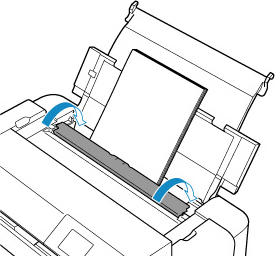
Slide right paper guide (F) to align both paper guides with both sides of the paper stack.

-
Close feed slot cover gently.
The paper information registration screen for the top feed is displayed on the LCD.
-
Select the size and type of paper loaded in the top feed at Page size and Type, select Register, then press the OK button.

-
Select Print from the software application's menu.
In general, select Print on the File menu to open the Print dialog box.
-
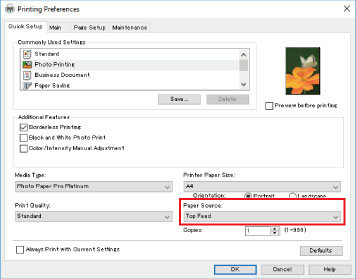
Select your model name and click Preferences (or Properties).
The printer driver setup window appears.
 Note
Note- Depending on software application you use, command names or menu names may vary and there may be more steps. For details, refer to the user's manual of your software application.
-
Select a frequently used profile.
In Commonly Used Settings on the Quick Setup tab, select a printing profile suited for the purpose.
When you select a printing profile, the Additional Features, Media Type, and Printer Paper Size settings are automatically switched to the values that were preset.

-
Select the paper source.
Select Top Feed at Paper Source.
-
After completing the setup, click OK, then execute print.
![]() Note
Note
-
The printer driver setup window enables you to specify various settings for printing.
-
For printing on long-length paper (paper that the length is up to 39.00 in. (990.6 mm)), make sure enough ink remains.
